Showing posts with label Heart Lab. Show all posts

Wednesday, June 17, 2009

Heart Lab: Parasol Mag


Like me, I'm sure you can't wait until a new issue of [insert your favorite online mag here] comes out. As you *flip through the never ending pages of inspirational images, interviews with your favorite artists... do you ever wonder how it all came together? What does it take to create a killer online mag? How much work and how many hours actually go into creating just one issue?

Yasmine, editor of Parasol kindly agreed to give us a peek of the making of an issue:

1.) Inspiration Day! - I spend about a day or a weekend reading, walking around my neighborhood or nearby towns, the flea markets, online, etc.

2.) Concepting - 6 hours to a day - I mostly doodle and play around with layouts.

3.) Contacting features by email or phone - A handful of hours, sometimes more if I or my interviewee feels chatty!

4.) Design & Layout - 3-6 hours, sometimes more because I get carried away and end up making multiple options.

5.) Following up, tying loose ends - 2-3 hours


6.) Finalizing Design & Layout - 2-3 hours

7.) Proofreading - 2-3 hours

8.) Uploading files - A few minutes

9.) Marketing and Promotion - Ongoing-- I announce in my blogs, contact blogs, mags, social networking sites, online communities. It's important to keep the mag and its features visible. The best marketing tool for me has been word of mouth.

10.) Email the featured individuals, groups and advertisers that the mag is up and I give lots of thanks.

11.) Sleep in, have a relaxing day or go on a mini vacation during the weekend. I design and draw full time so most of my hours are taken, but I make sure I have at least one weekend to recharge.

So next time you click that download button, remember all the hard work that went into it and be sure to pay the advertisers a visit, the folks that keep the lights on! AND if you really enjoyed the issue, give the editor a shout - I'm sure he/she would appreciate the feedback and the love!! Thanks Yasmine!!

Wednesday, May 27, 2009

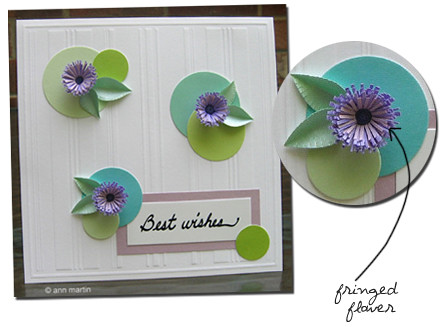
Craft 101: Fringed Flower Card

Fringed Flower Card
Designed by Ann Martin


With June weddings right around the corner, learn the simple technique of making double fringed flowers to dress up a stylish, handcrafted card.

Supplies:


1. Card blank - Die Cuts With A View, Stripes - white, pre-embossed, 5.5 x 5.5 inches
2. Dot Stickers – Martha Stewart Crafts – shades of green and blue OR use paper punches to make cardstock circles
3. Sculpture paper - lavender, purple
Purchase sculpture paper from craft stores or online quilling suppliers OR use text weight computer paper.
4. Pearlized paper - orchid, pale green
5. Slotted quilling tool
6. Calligraphy pen – Zig marker, black, 2 mm tip

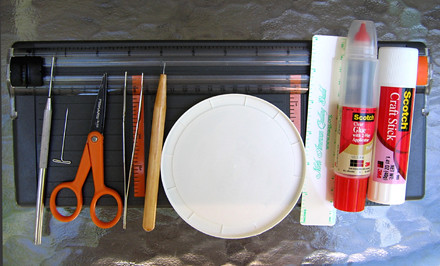
Supplies you probably have on hand:

7. Cardstock – white
8. Detail scissors
9. Ruler
10. Paper Cutter
11. Glue – suitable for paper
12. T-pin or paper piercing tool – to apply glue
13. Plastic lid – use as glue palette
14. Tweezers – for gluing flowers and leaves on card
15. Damp cloth or paper towel – to keep fingers glue-free
16. Glue stick or double-sided tape – to attach greeting


Fringed flowers (make 3):


1. Fringing: Cut a 3 inch x ½ inch strip of lavender and purple. Lay the lavender strip on top of the purple strip. Make even, fine snips along the length of strips with scissors, taking care to not cut completely across the width - but if you accidentally cut too far, all is not lost! Simply glue the pieces and continue fringing.

2. Flower center: Cut a 3 inch x 1/8 inch purple strip.

3. Rolling the flower:

a. With the lavender and purple strips still stacked, glue them together at one end.
b. Glue the 1/8 inch strip to the glued end of fringed strips.
c. Insert free end of 1/8 inch strip into the slot of quilling tool and roll toward the fringed strips. Continue rolling to end of strips.


4. Apply a small amount of glue to the strip ends. Slide flower off tool.

5. Fluff fringe open.


Leaves (make 6 in various sizes):


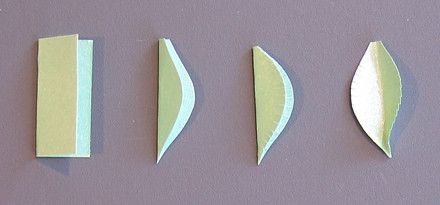
1. Cut 1 inch pale green square, fold in half.

2. Make a curved cut along the fold to make a half-leaf shape.

3. Without unfolding the square, make a series of tiny snips along non-folded edge.

4. Open leaf and shape tip for a realistic look.


Greeting:


1. On white cardstock, write Best Wishes with a calligraphy marker in your best handwriting. You might be surprised at how a calligraphy tip dresses up even the plainest script OR use a rubber stamp or your computer to print the greeting.

2. Trim greeting to 2.5 inches x 1 inch.

3. Cut a 3 inch x 1.5 inch orchid rectangle.

4. Center and glue greeting on the orchid rectangle.


Assemble:
Attach dot stickers, flowers, leaves, and greeting to card as pictured.

All photos by Ann Martin

Thanks Ann!!

Visit Ann at:
All Things Paper (blog)
Delaware by Hand


* Do you have an original article/tutorial that you'd like to share with Heart Handmade readers? Email us at hearthandmade[at]gmail.com (subject=craft 101).

Wednesday, May 20, 2009

Heart Lab: Pigeon Toe Ceramics


OK, I'm not gonna lie... ever since I saw Demi Moore in Ghost with her earthy rendition of Beals' famous flashdance look, I've had a secret desire to chop off all of my hair, straddle a potter's wheel and get my hands dirty (I can do without the whole Whoopi Goldberg part).

Pigeon Toe Ceramics, a fairly new brand, was founded last December by Lisa Hough. Every piece is hand-thrown porcelain on the wheel, made by hand in her Portland studio and then hand embellished. She also has an etsy shop at PigeonToeCeramics.etsy.com. She describes her work as rustic chic with Scandinavian influence - I couldn't agree with her more. She also has a collaborative artist series called PTC, Alyson Graves of Unruly Things (amazing blog by the way) is her first guest artist.

She kindly agreed to give us an exclusive look at her process in the studio. All of these beautiful photographs were taken by another talented artist Alicia Carrier. Enjoy!

1. The centering sweet shot
2. Centering the clay on the wheel to throw off the hump


3. Delineating the bottom of a thimble cup
4. Opening the clay to make a thimble cup
5. Widening out the floor of a thimble cup to get it to the correct size
6. Cleaning up the thimble cup before I remove from the wheel


7. Lifting the wall of a small tuck pot on the wheel
8. Creating the attached saucer of the tuck pot last from extra clay at the bottom


9. Unloading the kiln after a bisque fire
10. Bisqued tripod pots ready for glazing
13. Waiting for the clear glaze to dry on a pleat vessel
11. Pouring out glaze from a small tripod pot
12. Cleaning the excess glaze off carefully with a sponge


Make sure to visit www.pigeontoeceramics.com/our-process/ for a more detailed look of the process!

Thanks Lisa!!

Wednesday, April 15, 2009

Heart Lab: Meowstro

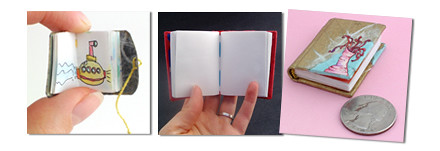
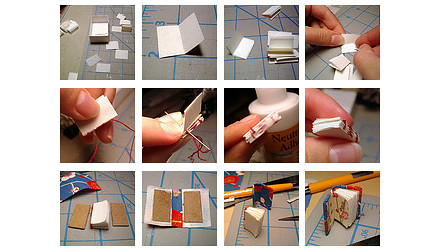
How cute are these tiny teeny journals and books made by Meowstro? Ruth, thank you so much for sharing a step-by-step breakdown of your process...

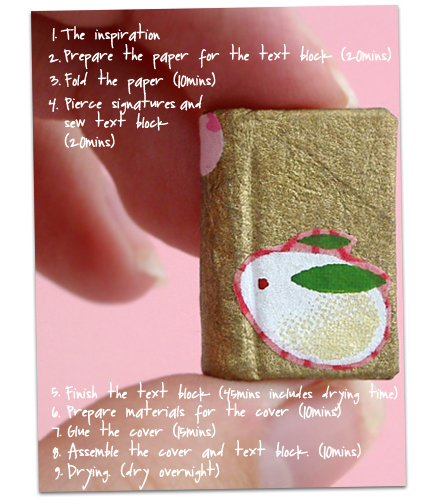
Step 1: The inspiration


I had been binding books for about a year when I saw a show at a library on miniature books - I thought to myself, if these are made just like a regular book, what's to stop me from trying to make one myself? That's how it all began.

Step 2: Prepare the paper for the text block

You'll need really thin paper - the thinner/ smaller the book, the thinner the paper - that way the pages will be easy to turn - I like airmail paper. It's good to use acid-free paper so your book won't disintegrate or turn yellow with age like an old paperback. I measure and cut all the paper down into squares approximately one inch by 3/4 inch with a straight edge and craft knife. Time: 20 minutes

Step 3: Fold the paper

In my bigger books, I usually stack 4 of the sheets (called leaves in bookbinding) and fold them in half to make one signature. With a miniature book I want to minimize bulk so I do three sheets. I fold 6-10 signatures depending on how thick I want the book to be (although even 10 signatures will only be about a quarter inch thick. Watch out, they're slippery! Time:10 minutes


Step 4: Pierce signatures and sew text block

I pierce four tiny holes in each signature to make my sewing easier later - if you sew without pre-piercing the holes, you risk your needle coming out in the middle of a page rather than in the fold. To sew, I measure out some thread - usually only about 10 inches or so, then sew the signatures together into a "text block" using my thinnest needle. Time: 20 minutes

Step 5: Finish the text block

I put a layer of archival PVA glue (a white flexible glue similar to Elmer's but fancier) on the spine to close any gaps between the signatures, and let it dry with a clothespin holding the text block together. When it's dry, I trim or sand the edges of the text block, then sew endbands at the head and the tail of the book for a decorative touch. After that, I create tiny endpapers and glue them to the first and last pages of my text block - now the guts of the book are done! Time: 45 minutes, including drying time

Step 6: Prepare materials for the cover

I cut out cover boards from very thin acid free cardboard, then cut the paper I'll be using for the cover and the spine - sometimes it's all one piece and sometimes I use a separate piece for the spine. I also cut a thin piece of paper to glue to the inside of the spine to strengthen it. Time: 10 minutes


Step 7: Glue the cover

I assemble the cover fully, starting with the spine and working out - hopefully the paper is cut wide enough to fold comfortably over the little cardboard, sometimes thick paper can be a pain to make into a cover. I use clothespins to hold the edges of paper down as it dries. Time: 15 minutes

Step 8: Assemble the cover and text block.

This style of binding, where you prepare the text block and then the cover separately, then glue them together is called "case binding" and the cover is called the case - like a suitcase or briefcase. I attach the text block to the covers by gluing the endpapers to the insides of the cover. I slip some waxed paper in between the endpapers to keep them from gluing to themselves, and hold the book shut with clothespins overnight to let everything dry. Time 10 minutes to overnight

Total time, about 2 hours plus drying overnight.

Thanks Ruth!! You can also learn more about Ruth and her awesome books on her blog.

Tuesday, March 24, 2009

Heart Lab: Knack Studios


Yay!!! SO psyched to have Barb of Knack Studios on Heart Lab. You don't understand how much I stalk her blog - I just adore her style and want every single piece of furniture she lays her hands on, the lady's got skillz. I've tried to convince her to move to the east cost and open up shop in my town, but unfortunately I don't think she'll be moving anytime soon... well, thank goodness for her blog.

Barb, thanks for sharing a behind the scenes look at your process.
The making of Chester's new digs....


>> click here to continue reading Heart Lab


Step 1: The hunt..... scouring and digging for Chester and pieces like him - days sometimes

Step 2: Decide on a paint palette and design including knobs and paper - oh man..... this is the most important part and takes countless hours of planning and dreaming up patterns and color combinations!

Step 3: Remove all old hardware and wood fill holes- 2 hrs because of drying time

Step 4: Sand and vacuum and wipe down piece- 45 min

Step 5: Apply first coat of paint - 1 hr

Step 6: Apply second coat of paint - usually a little quicker :)

Step 7: Sand off areas and distress finish- 30 min

Step 8: Vacuum and get all sanding dust off- 10 - 15 min

Step 9: Apply finish- 1 hour and 30 min

Step 10: Measure and drill new holes for knobs and line drawers with paper- 1 hour


Visit: knackstudios.com, knackstudios.blogspot.com

Thanks again Barb!!

Friday, February 6, 2009

Behind {whisper}

Heather Smith Jones' latest "finding winter, drawing spring" series has been plastered everywhere and rightfully so! I had a chance to ask Heather about the idea behind the {whisper} series, my personal favorite, and here's what she shared...


{whisper} series is an off-shoot of the "finding winter, drawing spring" series and I wanted the pieces to be spare and honest. I was thinking about how encouragement, hope, light, and so on can come to us somewhat quietly and softly... and how slowly we recognize these things. Each piece has the letterpress type { } blind embossed with the imagery between the parenthesis as if it is being whispered, perhaps to the viewer.


Thanks Heather!!

Wednesday, January 21, 2009

Heart Lab: Jill Draper


Jill Draper makes the yummiest and the squishiest handspun yarns... they look good enough to eat!! I don't know the first thing about hand-spinning, so here's Jill to give us newbies a little peek at how it's all done...


Step 1. Wind off 4 oz balls from the giant bag of roving: 5 min

Step 2. Soak the balls of wool b/c they need to be wet to absorb the dye : 3+ hours (although they do this alone - no supervision necessary)

Step 3. Dye the wool using acid dyes & set it with heat : 1 hour

Step 4. Hang the wool on drying racks - outside if it's warm inside w/ fans when it's cool or rainy out : 2-3 days depending on humidity

Step 5. Pre-draft the wool - basically like pulling apart string cheese to get the roving into thinner pieces to spin : 30 min

Step 6. Spin the singles, each ply is spun separately onto its on bobbin to be plied together with it's mate during the next step : 3-4 hours

Step 7. Change the head of my spinning wheel to the plying head & ply the singles together : 2-3 hours

Step 8. Wind the yarn onto a contraption called a niddy noddy that also measures the length of the hank : 15 min

Step 9. Weigh the finished hanks : 5 min

Step 10. Make the labels & label each hank : 15 min

Make sure you visit Jill's shop at jilldrapermakesstuff.etsy.com!

Thanks Jill!!

Wednesday, January 14, 2009

Heart Lab: Lee Meszaros


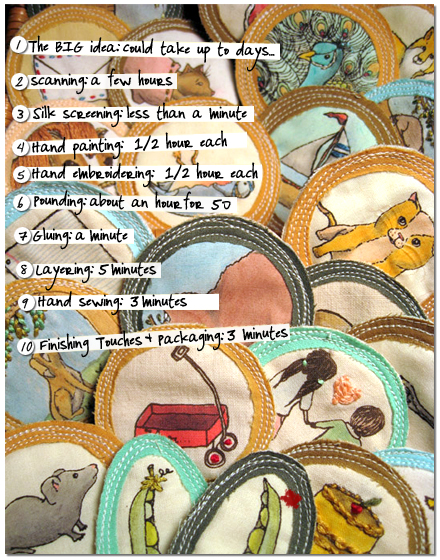
Lee makes THE MOST adorable merit badges on the face of this Earth.... I kid you not! You can snag one over at goodEGG or from her Etsy shop at leemeszaros.etsy.com. Lee, thanks for agreeing to give us a peek at your process...


Step 1. Thinking of common sayings and idioms that make sense to reward with a badge, and also contain a good visual for me to (attempt!) to draw. Usually ones with animals, random objects and food work out the best.

Time: sometimes days and days. I keep a notebook with me all the time to write down sayings I think of and hear.

Step 2. Scanning all of the drawings onto my computer to compile in Photoshop into one printout. Then using that sheet to expose a silkscreen.

Time: a few hours usually if nothing goes awry.

Step 3. Silk screening the various line drawings in black pigment on cotton. (Usually in multiples to save time.)

Time: less than a minute each.

Step 4. Hand painting the colour into each line drawing with watered down fabric pigment.

Time: around ½ hour each depending on how complicated.

Step 5. Hand embroidering little details onto each image.

Time: about a ½ each as well, also depending on how complicated.

Step 6. Pounding out the coloured ring border pieces, and the backing circle out of interfaced broadcloth in nicely dyed colours using some spiffy die cuts. I'm in the process now of getting a little die press made instead of the manual pounding. (Before the die cuts this step was done all by hand cutting traced circles- nightmare!)

Time: Done in multiples, so about an hour for 50.

Step 7. Gluing the coloured rings to each image and cutting around the ring to remove excess fabric.

Time: a minute.

Step 8. Layering the image, inside padding, and backing circle together and sewing them together with a sewing machine.

Time: 5 minutes

Step 9. Hand sewing a pin back onto the back of each badge. (Tip: waxing the thread with a little bee's wax keeps it from tangling, and saves me from many sewing related meltdowns.)

Time: 3 minutes.

Step 10. Pinning each badge onto it's display card and sealing them into their protective plastic pouches.

Time: 3 minutes.

Make sure you visit Lee's shop at leemeszaros.etsy.com!

Thanks Lee!!