
Craft 101: Fringed Flower Card
Fringed Flower Card
Designed by Ann Martin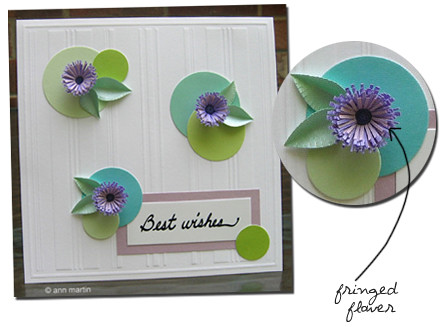
With June weddings right around the corner, learn the simple technique of making double fringed flowers to dress up a stylish, handcrafted card.
Supplies: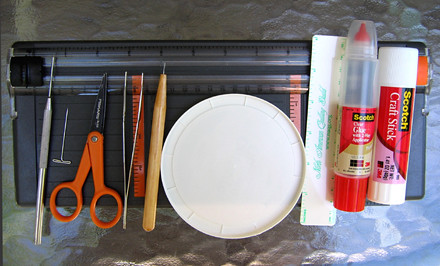
1. Card blank - Die Cuts With A View, Stripes - white, pre-embossed, 5.5 x 5.5 inches
2. Dot Stickers – Martha Stewart Crafts – shades of green and blue OR use paper punches to make cardstock circles
3. Sculpture paper - lavender, purple
Purchase sculpture paper from craft stores or online quilling suppliers OR use text weight computer paper.
4. Pearlized paper - orchid, pale green
5. Slotted quilling tool
6. Calligraphy pen – Zig marker, black, 2 mm tip
Supplies you probably have on hand:
7. Cardstock – white
8. Detail scissors
9. Ruler
10. Paper Cutter
11. Glue – suitable for paper
12. T-pin or paper piercing tool – to apply glue
13. Plastic lid – use as glue palette
14. Tweezers – for gluing flowers and leaves on card
15. Damp cloth or paper towel – to keep fingers glue-free
16. Glue stick or double-sided tape – to attach greeting
Fringed flowers (make 3):
1. Fringing: Cut a 3 inch x ½ inch strip of lavender and purple. Lay the lavender strip on top of the purple strip. Make even, fine snips along the length of strips with scissors, taking care to not cut completely across the width - but if you accidentally cut too far, all is not lost! Simply glue the pieces and continue fringing.
2. Flower center: Cut a 3 inch x 1/8 inch purple strip.
3. Rolling the flower:
a. With the lavender and purple strips still stacked, glue them together at one end.
b. Glue the 1/8 inch strip to the glued end of fringed strips.
c. Insert free end of 1/8 inch strip into the slot of quilling tool and roll toward the fringed strips. Continue rolling to end of strips.
4. Apply a small amount of glue to the strip ends. Slide flower off tool.
5. Fluff fringe open.
Leaves (make 6 in various sizes):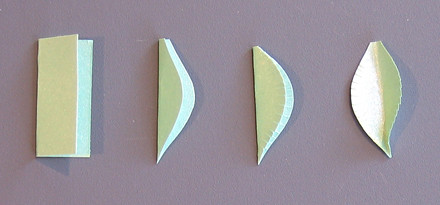
1. Cut 1 inch pale green square, fold in half.
2. Make a curved cut along the fold to make a half-leaf shape.
3. Without unfolding the square, make a series of tiny snips along non-folded edge.
4. Open leaf and shape tip for a realistic look.
Greeting:
1. On white cardstock, write Best Wishes with a calligraphy marker in your best handwriting. You might be surprised at how a calligraphy tip dresses up even the plainest script OR use a rubber stamp or your computer to print the greeting.
2. Trim greeting to 2.5 inches x 1 inch.
3. Cut a 3 inch x 1.5 inch orchid rectangle.
4. Center and glue greeting on the orchid rectangle.
Assemble:
Attach dot stickers, flowers, leaves, and greeting to card as pictured.
All photos by Ann Martin
Thanks Ann!!
Visit Ann at:
All Things Paper (blog)
Delaware by Hand
* Do you have an original article/tutorial that you'd like to share with Heart Handmade readers? Email us at hearthandmade[at]gmail.com (subject=craft 101).


2 comments:
these are so great...thanks for sharing them
lovely tutorial, aren't old-school pencils great?
Post a Comment