
Heart Lab: Meowstro
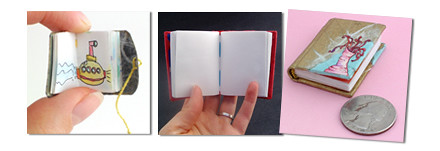 How cute are these tiny teeny journals and books made by Meowstro? Ruth, thank you so much for sharing a step-by-step breakdown of your process...
Step 1: The inspiration
I had been binding books for about a year when I saw a show at a library on miniature books - I thought to myself, if these are made just like a regular book, what's to stop me from trying to make one myself? That's how it all began.
Step 2: Prepare the paper for the text block
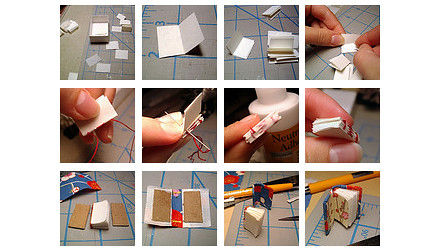
You'll need really thin paper - the thinner/ smaller the book, the thinner the paper - that way the pages will be easy to turn - I like airmail paper. It's good to use acid-free paper so your book won't disintegrate or turn yellow with age like an old paperback. I measure and cut all the paper down into squares approximately one inch by 3/4 inch with a straight edge and craft knife. Time: 20 minutes
Step 3: Fold the paper
In my bigger books, I usually stack 4 of the sheets (called leaves in bookbinding) and fold them in half to make one signature. With a miniature book I want to minimize bulk so I do three sheets. I fold 6-10 signatures depending on how thick I want the book to be (although even 10 signatures will only be about a quarter inch thick. Watch out, they're slippery! Time:10 minutes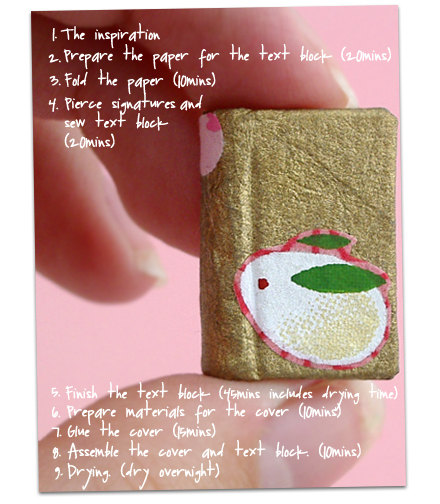
Step 4: Pierce signatures and sew text block
I pierce four tiny holes in each signature to make my sewing easier later - if you sew without pre-piercing the holes, you risk your needle coming out in the middle of a page rather than in the fold. To sew, I measure out some thread - usually only about 10 inches or so, then sew the signatures together into a "text block" using my thinnest needle. Time: 20 minutes
Step 5: Finish the text block
I put a layer of archival PVA glue (a white flexible glue similar to Elmer's but fancier) on the spine to close any gaps between the signatures, and let it dry with a clothespin holding the text block together. When it's dry, I trim or sand the edges of the text block, then sew endbands at the head and the tail of the book for a decorative touch. After that, I create tiny endpapers and glue them to the first and last pages of my text block - now the guts of the book are done! Time: 45 minutes, including drying time
Step 6: Prepare materials for the cover
I cut out cover boards from very thin acid free cardboard, then cut the paper I'll be using for the cover and the spine - sometimes it's all one piece and sometimes I use a separate piece for the spine. I also cut a thin piece of paper to glue to the inside of the spine to strengthen it. Time: 10 minutes
Step 7: Glue the cover
I assemble the cover fully, starting with the spine and working out - hopefully the paper is cut wide enough to fold comfortably over the little cardboard, sometimes thick paper can be a pain to make into a cover. I use clothespins to hold the edges of paper down as it dries. Time: 15 minutes
Step 8: Assemble the cover and text block.
This style of binding, where you prepare the text block and then the cover separately, then glue them together is called "case binding" and the cover is called the case - like a suitcase or briefcase. I attach the text block to the covers by gluing the endpapers to the insides of the cover. I slip some waxed paper in between the endpapers to keep them from gluing to themselves, and hold the book shut with clothespins overnight to let everything dry. Time 10 minutes to overnight
Total time, about 2 hours plus drying overnight.
Thanks Ruth!! You can also learn more about Ruth and her awesome books on her blog.


10 comments:
this is awesome! thank you so much for sharing. i love tiny little things, especially books. i am going to try making one this weekend!
Oh my goodness.....how adorable! So much work and such a teeny tiny wonder! I adore that teeny little bunny one!
xo
Melis
Those are so great, I love miniature things, especially books! I have a huge dollhouse for show.
these little books are beautiful!
These are wonderful! I am echoing all those who love teeny things.
couldn't love these any more than i do!!!
These are AMAZING! Thanks so much for sharing Ruth-they're darling! I'll be linking to this post.
So beautiful and so sweet! Thanks for posting such detailed instructions, too.
Adorable! Thanks for posting (saw this in Craftzine)!
Awesome tutorial and you had a lovely result I envy your patience, everything is sooo small I will surely try this ^^ thanks a bunch
Post a Comment