
Heart Lab: Jenni Brant
You remember the potting goddess Jenni right? Well, this week she shares the making of one of her exquisite plates...
1. Ritual (10 minutes)
Being in the studio is very sacred time for me. I work full time (and often more) at a local art center so my time to make my work is very slim. When I head to the studio, there is some ceremonial preparations that go into it – set up the laptop to broadcast Democracy Now, make tea or get a beer, put on my apron, clean up my work tables, and if the weather is nice I pull back the curtain and open then windows to let in the natural light and the fresh air...if it is cold, its all about getting the wood stove going.
 2. Game Play (2 minutes)
I work in series, making 4 or 6 of something at a time. Clay has to be worked in stages so I decide what I’m in the mood to make and set about making the parts and pieces necessary. Recently, I’ve been in a serious plate-making mood! I gather my tools and get to work.
3. Roll out a Slab of clay (10 minutes)I wedge up a few pounds of clay and then begin to pound the lump flat with the heel of my hand. I turn the slab over a couple of times and once it gets to be an inch or so thin, I roll it out to an even thickness with a wooden rolling pin (half the tools in my studio are the same things I would use in the kitchen). I work on fabric interface because it doesn’t imprint a texture on the clay like canvas does.
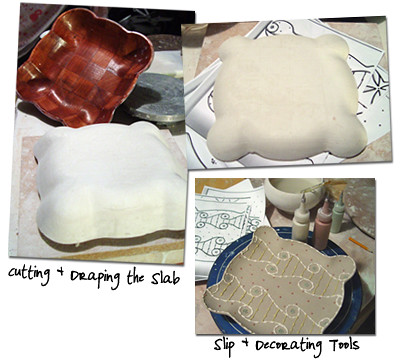
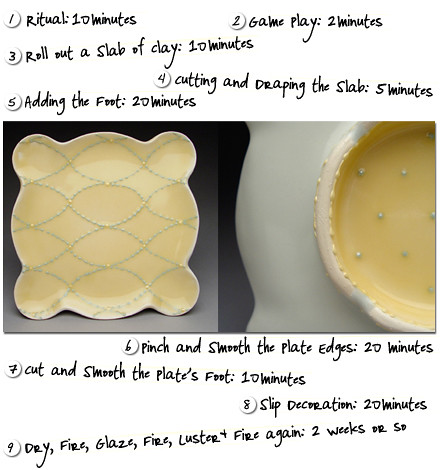 4. Cutting and Draping the Slab (5 minutes)
Now that the slab is evenly rolled out to be a quarter inch thick, I use a template to cut out a specific size and shape. I drape the clay cutout over a plaster mold, save some of the scrap to be use for a foot, and ball up the rest to be re-wedged and made into a second or third plate. I make plaster mold from the treasures I find at the thrift store – some people just don’t realize the aesthetic potential of some of their own junk.
 5. Adding the Foot (20 minutes)6. Pinch and Smooth the Plate Edges (20 minutes)7. Cut and Smooth the Plate’s Foot (10 minutes)8. Slip Decoration (20 minutes)9. Dry, Fire, Glaze, Fire, Luster and Fire again (2 weeks or so)
Now its just time to sit aside and let the piece dry. Once the clay is bone dry, I load it in an electric kiln with several other pots and ‘bisque’ them by firing the kiln to 1750 degrees. I’ll let them slowly cool back to room temp, unload, apply glazes (which is a whole other list of 10 or 12 steps), reload the kiln and fire them to 2200 degrees. Once they cool to room temp again (its like opening a giant Christmas present), I unload and choose which pieces with have like mother-of-pearl luster highlights added. I apply the luster, load them up again and fire ‘em off. And WHALA!, a couple of weeks later, I have a beautiful, functional ceramic plate that I will now go eat a big piece of chocolate cake off of! YUMMY!!
Thanks again Jenni!!


2 comments:
Just gorgeous and so incredible to hear more about her process...Thank you!
xo
Melis
Beautiful! It's so great to learn more about how Jenni creates her masterpieces. So much work and such a lovely result!
Post a Comment