Heart Lab: Yasha Butler
When I think of Yasha Butler's work, the words grace and poetry instantly spring to mind. Stay tuned for a more close-up view of Yasha and her works of art on December 1st - in the meantime, I hope you enjoy this sneak preview...
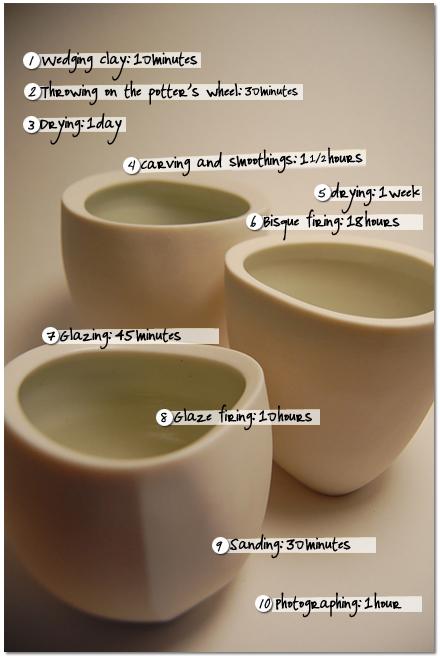
1. Wedging clay (10 minutes)
First I take a bag of porcelain clay and cut off a 2 pound chunk. Then I wedge (sort of like kneading dough) the clay to ensure that it has an even consistency. When the clay is fully wedged I pat it into a ball.
 2. Throwing on the potter's wheel (30 minutes)
I have elevated my electric potter's wheel on cinder blocks so that I can throw standing instead of sitting. Not being hunched over the wheel has been much better on my back. I place the ball of clay in the center of the wheel. Coating the clay with a thin layer of water, I set the wheel to the highest speed and begin centering the lump of clay. Once the turning clay looks like it isn't moving it has been centered. Lowering the speed, I open a hole in the center of the clay, pull up the walls, define the lip and presto I have a cup. Then, I separate the cup from the wheel with a wire cutter.
 3. Drying (1 day)
Porcelain is a very finicky material that has to be worked on at specific times during its drying process. I let the wet cup that I have just removed from the wheel set up for 30 minutes, so that it isn't tacky to the touch and has a bit of resistance. At this point I alter the symmetrical lip of the cup to give it an organic shape reminiscent of a river stone. I lightly cover my piece with plastic and let it slowly dry for about a day.
 4. Carving and smoothing(1.5 hours)
When I return to my cup a day later the clay is at a state called “leather hard”. It is hard enough to keep its shape, but still wet enough to carve. I use a wrasp, which is similar to a cheese shredder, to shape the walls and foot of my cup to reflect the asymmetrical shape of the altered lip. Then I smooth the rough surface with a metal rib, going over every spot until there is no trace of the wrasped surface. I also smooth out the angular lip and define the sharp edges. Finally, I lightly burnish the surface with a soft rubber rib.

5. Drying (1 week)
As I said porcelain is a very finicky medium and it has to be dried very slowly. Since my altered cup has different wall thicknesses, the slow drying is even more important because it can crack. I tightly wrap my altered cup in plastic and let it sit for a day. This step allows for the whole piece to reach a consistency in moisture. After this I begin to slowly loosen the plastic wrap on a daily basis allowing the piece to dry slowly until it reaches “bone dry” state. This takes about a week.
 6. Bisque firing (18 hours)
I place my bone dry cup (and many others) in an electric kiln and bisque fire it. This process eliminates all water from the piece, but leaves it porous enough to absorb glaze. I do a slow firing to be on the safe side and eliminate any explosions of wet cups.
 7. Glazing (45 minutes)
It takes me about 1.5 hours to weigh out the ingredients, wet mix and sieve my glaze. However, I usually do this in advance. So, at this point I just sieve my previously mixed glaze several times to ensure there are no chunks. Then I wipe down my cup with a slightly damp sponge to remove any clay dust and glaze the interior. I like to leave the exterior of my cups bare porcelain. After the glaze dries I cleanup any drips on the exterior and put my three dot signature on the foot of the cup.
 8. Glaze firing (10 hours)
This is the last firing. During this firing the glaze melts and turns into glass creating a shinny surface. Once the firing is finished it takes about a day for the kiln to cool down before I can open it. Waiting at this point is the hardest part.
 9. Sanding (30 minutes)
After removing my cup from the kiln I am ready for the last step! I sand the bare porcelain exterior with wet sandpaper, which gives it a silky smooth feel. This final process adds a tactile quality to compliment the visual. After all this work I have a hard time giving up my cup, but I also love sharing my work with others. So I move onto the final final step.
 10. Photographing (1 hour)
Doing a good job of photographing work is almost as important as making good work. Getting accepted to shows, selling online are all dependent on the quality of your photography, so I try to do the best I can. I use a light box that I made out of an old cardboard box, two 100 watt lamps and a simple digital SLR camera. After taking a bunch of photos, I pick the best few and try to find a new home for my cup!
Thanks Yasha!!


3 comments:
wow....I mean..what a time intensive process and so much patience required..I am so amazed and even more in love with Yasha's pieces than I was before. Just beautiful...thank you!
xo
Melis
It is telling that creating pieces that are so elegant in their simplicity requires so many steps. Love Yasha's work!
Such beautiful work!!
Post a Comment