
Heart Lab: Hobocamp Crafts
Honestly, this is one of the cutest coffee cuffs that I've ever seen. Prime example of why handmade rocks, look at all that attitude and personality... on a coffee cuff!!!??!! Now, would you rather burn your hands or even worse... use a boring cardboard one... or rock one of these babies?
Mel, the creative genius behind Hobocamp Crafts was nice enough to put together this Heart Lab/Craft 101...
Step 1: The Base
Whether I am making coffee cuffs or dolls, I start by having the monotonous part done first, which is the cutting of numerous backings. That way I can spend the rest of the time getting inspired & creating! To cut your backing, figure out your measurements and which material you want to use. 5-10 minutes measure first, then cut.
 Step 2: Inspiration
What inspires you? Maybe a walk outside, reading through your favorite magazine or blog. Whatever it is- now is the time to soak it in! I love keeping an inspiration board with pictures to give myself a creative jolt. You can even draw your design out first. This could take all day! 10-15 minutes to gather inspiration & make a sketch.
Step 3: The FabricNext, I try to decide what kind of fabric I want to use for the outside of the cuff, I love using vintage pieces, scraps, recycled clothing, wool sweaters- you name it! Once you've decided, stitch this to the backing. Try seeing the possibility in all textiles and you'll never get bored! About 5-15 minutes depending on your fabric stash, possibly longer.
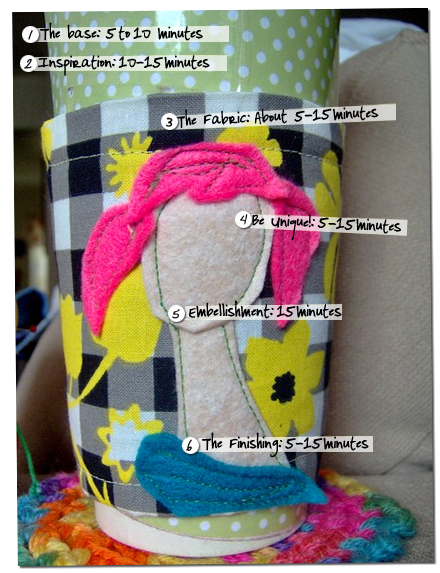
Step 4: Be Unique!
The faceless girl has been a trademark of mine since high school. When I painted I never usually added features, just hair and a strong jaw or brow line. This has evolved into my medium of sewing. The fact that my girls have no features, leave them open to interpretation. Find your trademark or just something you love, a giraffe, a flower etc. This can be tied into inspiration, if you have an idea already brewing or need to sketch out a few, 5-15 minutes.
Step 5: EmbellishmentIndeed many fabrics are quirky and cute enough to stand on their own. But I think some get lonely… and need a piece of ribbon or an appliqué. Figure out which type your using and how you plan to attach your extras. For me, machine or hand sewing is the easiest, but some may prefer strong craft glue. Hand sewing takes longer, about 15 minutes.
Step 6: The FinishingNow that you have a backing & fabric stitched together, an adorable embellishment on the front- sporting your own cool self, it is time to size this baby! If you're using this for a travel mug, a regular cardboard coffee cup or even a bottle, measure the circumference around or turn the cuff inside out pin it to fit the cup and then stitch up the seam! The art of handmade is one of the most fulfilling life endeavors. You can feel good that you are saving trees with this cuff and bask in the ray of compliments you'll receive! 5-10 minutes for measuring, sewing and snipping off the extra fabric.
Thanks Mel!!


2 comments:
So great! MUCH better than burning your hands, for sure! :)
xo
Melis
I love Mel and I really enjoy her blog. So happy to see her here sharing her knowledge. Her coffee cuffs are great!
Post a Comment