
Heart Lab: Esta Sketch
The making of an Esta Sketch silkscreen print...
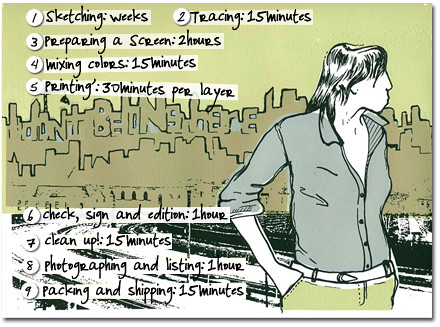
1. Sketching (Weeks)
Sometimes I draw speculatively, I'll have an image in my head and I'll try to get in onto paper as best I can. Other times I work from photos, or even a mirror if I need some figure reference. Often it's a combination of both, as well as any inspiring patterns, text, clippings that I've found recently. I love drawing but it takes a long time, I usually have several on the go at once, I'll come back to a drawing several times over a week, add something, erase something, rearrange something. And if I still love it a week or two later then I can commit to printing it, haha.
 2. Tracing (15 minutes)
I lay architect's tracing paper over my sketch and trace the image onto this with a nib and acrylic ink. It gives me a very different quality of line than I get working in pencil, it smooths all my lines out, makes things neater and more substantial. This becomes the stencil I use to burn images into the silkscreen.
3. Preparing a screen (2 hours)I coat a screen with photographic emulsion and leave it to dry for a few hours. Then, working under a yellow safe light I tape my drawings onto the back of the screen, checking and double checking that I haven't accidentally reversed an image. The screen is then placed under UV light for about 4 minutes. This light hardens the emulsion so it won't wash off. Anything that is protected from the light (underneath the black lines of your drawing) won't harden. Once exposed I hose the screen out and like magic my drawing appears, ready to be printed!
4. Mixing colors (15 minutes)I do this while I'm waiting for my screen or the first layer of printing to dry. I'm always trying to get softer, duller colors, subtle shades, nothing too bright. I use acrylic paint mixed with a printmaking medium, and with acrylics you have to keep in mind that they're going to dry darker (and often a totally different shade) than they look when they're mixed. You get some surprising results sometimes!
>> click here to continue reading about Lisa's process
5. Printing (30 minutes per layer)
I usually do some base colors just using paper stencils. The simplest thing screen printing! I photocopy my original drawing, cut out simple shapes to block in with a background color, tape it to the back of an open screen, and print away. Piece of cake.
To print the outline (the one I made in step three), I tape a sheet of acetate (clear plastic) onto the table under the screen and first print onto this. Then you simply slide your paper underneath this and line each one up to register the image perfectly on top of the previous colors.
6. Clean up! (15 minutes)Ergh. It needs to be done after each layer. Dry paint is no fun, especially when it starts blocking your screen. I wash the screen, squeegee, palette knives, acetate, wipe down the table and anything else I've dripped paint all over. But again it gives me something to do while I'm waiting for my screen and my prints to dry.
7. Check, sign and edition (1 hour)Once all the layers are printed I sit down and sign and edition all of my prints. Occasionally I do make mistakes, overink areas, don't register things properly, etc so I weed out the imperfections and whatever is left becomes my edition size. (But then I get to turn the mistakes into notebooks and other cool things!)
8. Photographing and listing (1 hour)I like to photograph things all in one go. I like groups of things, I never seem to do just one image, there is usually several in a series. So once all the prints are done I can get all the photographing out of the way at once and get back to making things.
9. Packaging & shipping (15 minutes)I store prints in an archival solander box. Once sold, each goes into a clear plastic sleeve with a business card, then into a stiff cardboard mailer with a couple of extra bits of cardboard for extra protection. I couldn't bare any creases in my prints! I include a handprinted thank you note and often a little extra handprinted goodness, seal it up, address it and ship it out.
Thanks Lisa!!


2 comments:
So great! So wonderful to learn more about Lisa's work and her process.
xo
Melis
hey marichelle! thanks so much for letting me be part of heartlab, it was great fun :)
Post a Comment