
Heart Lab: Objet de Carte

Robert Brownstein of Objet de Carte emailed me with some information about his fascinating handmade cards, one look and I knew I had my next Heart Lab post!
Here he describes his method for making the handcrafted cards (a set of 20 cards) shown below, which are later finished and made into stationery or cut up into pieces for his assemblage artwork.
Supplies needed:
paper
paint
corn starch paste - there are many recipes for corn starch paste online
paint extender/medium
Mod Podge
sponge paintbrushes
graining comb (or any object to remove paint from top layer)
rolling pin or brayer
clean newsprint
masonite panels
weights for pressing
paper cutter/utility knife and steel ruler
bone folder
Step 1: Cutting Paper
Lots of different papers work for this process, but I like to use 60 lb.white watercolor paper. Decide what size cards you are making, and cut down sheets oversized to allow for trim on all four sides when finishing. 6" x 9" in. is a convenient size to work with. 6" x 9" will yield a folded card for an A2 envelope (4 3/8" x 5 3/4"). - 5 Minutes
 Step 2: Painting Base Coats
Tempera, acrylic, and latex paints all work. You may have to add medium to the base paint to make it more flexible so that it doesn't crack if making folded cards. Tempera cracks the most, and is best used for bases on non-folded cards or for top coats only. Sometimes bases need 2 coats, so time can vary on this step. And drying time depends on type of paint used. - 30 to 45 Minutes, then drying time.
Step 3: Painting Top Coats and CombingApply an even, thin, top coat of paint. Cover completely. If paint is unworkable, add corn starch paste or medium. Then comb a design into the wet paint to expose the bottom layer. I like to use the rubber triangular graining combs with different sized teeth on each side. These are available at most craft stores or places where paint texturing supplies are sold. Experiment with lines and curves or use different objects to scrape away the paint. Anything goes, and it's fun to play here. Don't like what you did? This process is very forgiving. Simply reapply paint. You have a window of time to work with the top coat before it starts getting tacky. The longer you wait to comb, though, the more paint drag you will have. Sometimes this is a desired effect. And it's very easy to change the color of the top coat right as you are doing it. Just a few drops here or there to alter it. It's fun to change the color slightly for each card in a set to see what happens. Color stories emerge, and you will see certain combinations that really work. - 45 Minutes to 1 Hour, then drying time
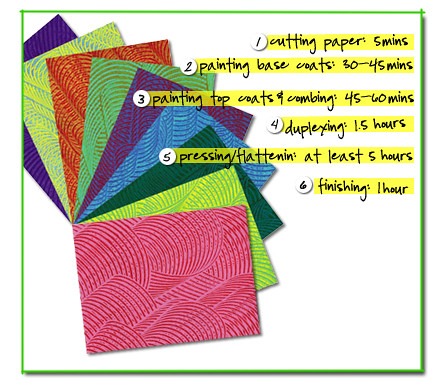 Step 4: Duplexing
When dry, gather the painted sheets together and work them to minimize the curl of the paper, then duplex each sheet one at a time. With a sponge paintbrush, evenly apply a thin coat of Mod Podge to the back of a painted sheet and then lay it on top of a clean sheet. If the clean sheet is the same size as the painted sheet, simply line up edges. Then place a sheet of paper over the card and use a rolling pin or brayer to smooth over a few times. - 1.5 Hours
Step 5: Pressing/FlatteningThen lay the card between newsprint and press between masonite panels weighed down with heavy objects. I put each card in between its own set of masonite panels and stack them. Then I weigh the stack down with 12" x 12" granite tiles or piles of large books. - At least 5 Hours, best Overnight
Step 6: FinishingTrim cards on all four sides to final size. A paper cutter is the tool of choice, but a utility knife and straight edge work too. Just watch the fingers and make sure to use a sturdy knife and a good steel ruler. For folded cards, a very handy tool here is a bone folder. Use the end to score a center line along a straight edge, then fold along the score. - 1 Hour
 Visit Robert Brownstein's shop at www.objetdecarte.com.
Thanks Robert!!


3 comments:
Beautiful....beautiful cards and beautiful artwork..
thanks Robert, off to check out his site!
xo
Melissa
This is so great. I may have to try doing this myself!
Fantastic! these cards are amazing!!! Checked out the website and there is so much more great stuff there - a brilliant artist with a unique perspective.
Post a Comment