
Craft 101: Encaustic Painting
Marija sent me an email to share her paintings and she described her technique as "eco-conscious encaustic". So I began looking into it and discovered lots and lots of wonderful work available on Etsy using this technique...
>> continue reading about encaustic painting
I'm not sure how many of you are already familiar with encaustic painting, but since I knew absolutely nothing about it, I asked Marija if she would be willing to give us a primer. Of course she went above and beyond and created this wonderful tutorial!
Take it away Marija...
Encaustic art continues to attract increased attention, from its unique aesthetic properties to being a forgiving medium, encaustic painting can be eco-conscious and easy to learn. “Encaustic painting” – generally refers to a painting that is comprised of pigmented wax. The most commonly used wax for encaustic is purified (white) beeswax. Although many artists have their own specific encaustic formulas, which may include other types of waxes and/or polymers, I tend to use 100% beeswax.
SAFETY FIRST
There are a few safety tips to keep in mind right off the bat when working with encaustic. Firstly, ensure that you are working in a well-ventilated area throughout your process. To my knowledge, it is not the beeswax itself that may be most hazardous to your health, it is the inclusion and heating of oil paint, so be careful. Secondly, encaustic painting requires heat, from electric grills to heat guns, etc. so make sure that you are fully aware of your equipment and temperatures at all times.
There are many ways to incorporate eco-consciousness to your encaustic art. I use 100% renewable windpower produced paper for my eco-conscious encaustic collages along with a medley of reused papers (poetry, wallpaper, scrap paper, etc.), reuse is key here! Feel free to approach local shops in your neighborhood for reuse materials, from scrap fabrics to wallpaper samples, there is a lot out there. Contact a local interior designer, or architect for scrap materials, be creative, you never know what you will find for free.
Although I first learned encaustic in a classroom environment and I highly recommend taking an encaustic art class/workshop, here's an outline of one of the techniques I use to create my collages. Enjoy!
 SET-UP
1. It is best to work on wood board or thick paper (50lb or above), not canvas. If working on wood board, cut a piece of thick paper the size of your wood board and use white glue to glue the paper onto the face of your wood board.
tip: I use painter’s tape (lower tack) to mark out my collage surface on paper so that I don't get paint into the margins.
COLLAGING 2. Begin collaging by either drawing out your design, or cutting and gluing your elements. I like to glue my assorted papers first (this is where I begin using all of my delicious reuse finds) and then draw my additional components. I complete my collage by painting.
tip: I recommend that you paint with acrylic paint. Not only is acrylic paint non-toxic (read the label first) but it is also water-soluble and no fumes. I also love the fact that you can use water to stretch and blend acrylic paint and that it dries so fast (instant gratification!). Once your collage is complete and has fully dried, you are ready to apply the encaustic treatment.
All steps below should be done in a well ventilated area.
PREPARING COLORS3. You need to decide what colours (if any) to mix into your wax treatment in advance. You must use oil paint to apply colour to your wax (oil and wax mixes together, wax and water do not). You really only need very little oil paint and it's much better to apply several coats of your encaustic treatment than to have a darker coloured wax (because after a few strokes, your work will become too opaque and the collage underneath will not be visible, unless this is the look you are going for).
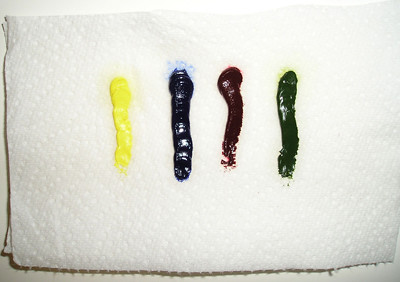
To prepare the oil paint, take a small piece of paper towel and fold it in half (double thickness). Draw one small vertical line of paint in every single color that you'll be using. After 10-15 minutes (longer is much better), you'll see a golden stain around your oil paint colours. This is a good sign, it's actually excess oil that you don't need nor want in your encaustic mix.
tip: I love to add white paint to my beeswax, I use it most, but you should know that Titanium white and Zinc white are quite different. Titanium white is often a truer white, while zinc white has a hint of yellow and can give your painting a cloudy and uneven finish (which you might like, so go ahead and experiment!)
PREPARING THE WAX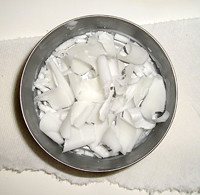 4. Although there are several encaustic wax concoctions out there, purified beeswax is really all you need. If possible, buy the beeswax in strips or pellets. Contact a local honey farm (another way to keep it eco-conscious). My advice for beginners is to make sure that you buy purified beeswax, as apposed to regular beeswax, which is yellow. The yellow in the regular beeswax is pollen and other organic (as in carbon based/nonsynthetic product not pesticide free) components that will be visible in your work and may affect its consistency. Purified beeswax is much better for archival purposes as well. You can prepare your beeswax by ensuring that it is broken into small pieces for melting.MELTING THE WAX
5. Melting your wax is a fine science. The best way I discovered, is to use a counter top electric pan/skillet that has temperature settings. If you don't have a temperature setting on your electric skillet you will not know what approximate temperature your wax is being heated at and this can be very dangerous. The smaller the skillet the less energy you'll use. So there is no need to spend a lot, you can easily buy a small skillet for less than $40 or buy a used one. NEVER use your skillet for food preparation once you've used it for encaustic painting. You should melt your wax at a temperature between 200-250°F. Sometimes I keep it closer to 250°F in the beginning and reduce it to between 200-225°F once melted and while I am working with it. You can always bring the temperature up close to 250°F again for a few minutes if your wax begins to get thicker or harden.
You will need one can per color, plus one extra. The extra can is for melting uncoloured beeswax (always helpful to have).
tip: You want to use clean cans, my favourite are tuna cans. Smaller cans fair better, remember that heat needs to travel up, so wider and shorter cans are better than taller cans. Do not use cans that have a colour coating (white is very common) on the inside as this coating often flakes off with heating and can ultimately contaminate your wax (a big no no, you will be quite sad). Make sure that all of the paper and glue on the outside of the can are completely cleaned off (warm water helps speed the process along).

6. Once your temperature is set, fill your cans (at most half full to start) with small pieces of purified beeswax and transfer the cans into your skillet.
Wait for the beeswax to completely melt before adding colours.
ADDING COLOR7. To add colour you need to use your encaustic painting brushes. Brushes for encaustic CANNOT be synthetic as synthetic brushes will melt (and release fumes). I use hog hair brushes. They are the cheapest non-synthetic brushes. Although I would never eat pig, I have to tell you that your encaustic brushes should last a long long time, the wax will also help preserve the hairs so you shouldn't have to buy many brushes at all. You do need one brush per encaustic colour. The other eco-conscious aspect to encaustic painting is that there's no need to ever clean brushes. So no water, soap or toxic cleaning products needed/wasted! To add colour, once your wax is melted, take your brush and dip it into a very small amount of oil paint from your paper towel and mix it into a can of melted beeswax.
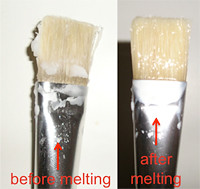 NEVER leave your brushes sitting in cans of hot wax, you are likely to end up hitting your hand against a brush and tipping the whole can of hot wax all over your skillet (it happens). Always, designate a place (old ceramic plate is best) to set your brushes down. Don't worry about your brushes stiffening, you simply need to gently swirl the brush a few times in your melted wax.
If you do spill wax on your skillet, ONLY use non-synthetic fiber (an old cotton tea towel, cotton t-shirt, etc.) to clean (soak up) the wax. Synthetic fibers (i.e. polyester) and blends will also melt in your skillet (yikes!).
READY TO PAINT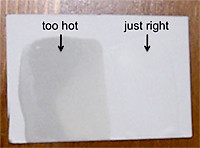 8. Once you have coloured your wax do try to reduce and maintain your heat to 225°F or slightly under. You are now ready to paint! Gently soak your bristles in one of the melted waxes and test on a scrap piece of paper (the same type that you're using for your artwork). If your paper becomes transparent, your wax is too hot and you should slightly reduce your heat. Once the test patch doesn't turn your paper transparent, then you are ready to go.
 Dip you brush into your wax again and brush over your collage.
Even melted wax stiffens quite quickly, so you will need to repeat this process many a times. Dip your brush and stroke over your collage, dip, stroke, dip, stroke, etc. until you have a few layers of wax. On paper, I usually do 3-5 layers of wax, but this is completely dependent on your colour and the effects that you wish to achieve.
9. Once you have completed applying the wax treatment, turn off your skillet.
 Allow your cans to cool and remove them from the skillet. Store your cooled cans in a cool place so that you may use them again (you just remelt the wax in the cans as described above, nothing wasted here). One quick note about remelting, make sure that you poke a few holes, either with a fork (or other metal object that you will now only use for encaustic painting) into the wax that has hardened in the cans to allow gases to escape, very importantDRYING TIME
10. To complete your encaustic process you need to seal your wax, which is often done with a heat gun (I have to admit that I have been known to use my hairdryer at times, talk about reuse). Again, ensure that you are in a well ventilated area before you begin. You want to turn the heat gun to a low setting (NOT high). DO NOT work on a carpeted or other flammable surfaces, such as newspaper, etc. You want to gently run the heat over your encaustic painting. Using circular motions (working within a small area at a time) and keeping at least 5 inches away from the surface of the wax coating (DO NOT touch the wax). As soon as the wax coating in an area begins to look moist (evidence of the wax melting) then move to another area of your painting. This process usually takes me 5 minutes, but it is completely dependent on the size of your piece. Be careful where you set your heat gun after you are finished, as even on a low setting it is going to be VERY hot, so leave it in a safe place within sight to cool.
11. Voila! Your eco-conscious encaustic collage is complete.
Please be sure to send me an email mahamarija[at]gmail[com]com if you have any questions and because I would love to see your work! For more of my work, please visit my *new Etsy shop.
Recommended book:
The Art of Encaustic Painting: Contemporary Expression in the Ancient Medium of Pigmented Wax
Credit: Tutorial and associated images courtesy of Marija Hamed
Thanks again Marija!!
>> see other Craft 101 features


8 comments:
Lovely, just lovely! Wow! so much work that goes into encaustic paintings! Thank you for sharing.
xo
Melissa
this looks really cool and fun! thanks for sharing!
hi Melissa & Liz, glad you enjoyed Marija's piece...wish I had the time to try this out.
I had a semi-obsession with candle wax as a kid. It's not even close/related, but I used to love making balls out of candle drippings - I know, totally weird and totally random :)
I don't know anything about encaustic paintings, but I was wondering if it would work well with powdered pigments? I am thinking it would save the paper towel step because you wouldn't have to remove the oil. Or do you need some of the oil to make this work well? In any case, I think the results look great!
Wow, I had never heard of this before. You gave great information and the tutorial was wonderful. I will have to research this a bit more, see what I can learn about it! Now you have me all curious and wanting more information...see what you did. ;)
hi anika, I'm so glad you found Marija's tutorial useful and inspiring! I'd love to hear about what you end up finding/trying out!
Ah THANKS for this tutorial. I've had it bookmarked in my bloglines since it was posted. I've always been so curious about encaustic and this clears SO much up. Thanks again!
hi monique, thanks for coming back! It's so nice to hear that the tutorial helped! Yay!
Post a Comment