
Buyer's Notes: Hit me with your best shot
Product Photography
In the world of handmade the harsh reality is that presentation is often more important than the product itself when selling online. In order to capture the imagination of a potential customer or editor, we have to make sure that our products are showcased in the most compelling way possible.
I wanted to showcase a few sellers doing a really awesome job with their product shots and what we can learn from each of them...
1. consistency: Whitney, of luckymebeads consistently shoots her necklaces and pendants with a chalkboard background along with a short caption. Her photos are instantly recognizable.
2. mood: Vanessa of Vanessa without borders chose to shoot her bags on the beach - a perfect setting that compliments her products. It instantly gives me an idea of what I could use the bag for.
3. creative background: I love how Shannon of rifferaff uses what looks to be a wooden trunk as her background. The metal detail adds to the richness of the photograph and really makes the notebook and print stand out. To me, it screams quality.
... sometimes simplicity is best
4. white background: sometimes all you need is a white background. Olive Essentials uses this fuss-free technique allowing the product to do all the talking!
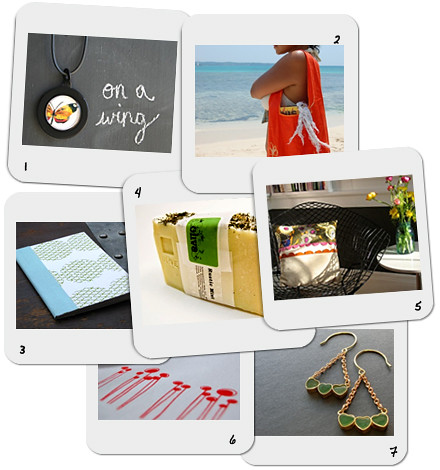
5. composition: like mood, I love when sellers create stories with their products. It gives it such a professional crisp look. Amy of AmyMarcella is an expert at this.
6. up close and personal: Johanna of 12gypsies always provides a close-up shot. It really allows the customer to see and appreciate the quality of the screenprint, colors and materials in her products. I also love how she plays with the focus setting - really adds extra drama.
7. contrast: Lauren of local library uses a dark backdrop for her jewelry. The green and gold really pop. She also pays close attention to the positioning of the pieces, so even though they're not being modeled, they still retain a certain movement to them. Again, adding drama and richness, which to me, conveys high quality.
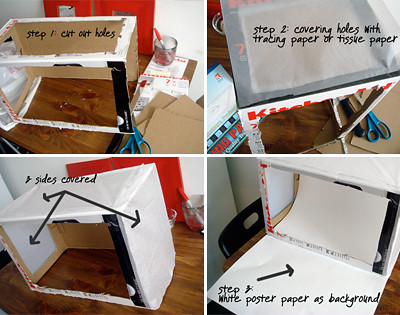
Like most sellers, I'm not a professional photographer nor did I have the funds to hire one. So when I decided to start selling my pouches on Etsy, I did some research and was able to make a "photo studio" for less than $10. I've compiled a short list of useful resources below if you're interested in learning more about photographing your products.
2. mood: Vanessa of Vanessa without borders chose to shoot her bags on the beach - a perfect setting that compliments her products. It instantly gives me an idea of what I could use the bag for.
3. creative background: I love how Shannon of rifferaff uses what looks to be a wooden trunk as her background. The metal detail adds to the richness of the photograph and really makes the notebook and print stand out. To me, it screams quality.
... sometimes simplicity is best
4. white background: sometimes all you need is a white background. Olive Essentials uses this fuss-free technique allowing the product to do all the talking!
5. composition: like mood, I love when sellers create stories with their products. It gives it such a professional crisp look. Amy of AmyMarcella is an expert at this.
6. up close and personal: Johanna of 12gypsies always provides a close-up shot. It really allows the customer to see and appreciate the quality of the screenprint, colors and materials in her products. I also love how she plays with the focus setting - really adds extra drama.
7. contrast: Lauren of local library uses a dark backdrop for her jewelry. The green and gold really pop. She also pays close attention to the positioning of the pieces, so even though they're not being modeled, they still retain a certain movement to them. Again, adding drama and richness, which to me, conveys high quality.
Like most sellers, I'm not a professional photographer nor did I have the funds to hire one. So when I decided to start selling my pouches on Etsy, I did some research and was able to make a "photo studio" for less than $10. I've compiled a short list of useful resources below if you're interested in learning more about photographing your products.
Here are a few more useful links:
How I made my $5 photostudio
Taking Professional Looking Photos Without a Professional
How to make an inexpensive light tent
Really cheap homemade diy studio - no lighting needed
VIDEO: Etsy - Photographing Your Items


13 comments:
Good Morning Marichelle!
You are too sweet. Thank you again for the kind words. I am lucky enough in this house to have good natural light but I've used homemade and store bought light boxes before and they work great!
Thanks for the informative post!
xo
whitney
I am happy as a clam that I just found your blog, adding it to my faves now. What fun stuff, pretty pictures and nice insight!
super helpful...thanks!
whitney: I know exactly what you mean. I take photos while I cook every night and my food shots never look good after 4-5pm!
Jennifer: thank you!!! means a lot coming from you!
simplesong: Thanks for the feedback - really nice to know that it was useful!
wow--thank you so much for this great post! product photography is so important, yet it is an area where i really struggle. this gives me an idea of how to improve things. keep up the EXCELLENT work!
Katherine, good luck with your photos! I'd love to see some before and after shots!
Thanks for sharing these great photography examples! I am looking for ways to make my photos stand out, and when I move house next I will hopefully have better light and will be snap, snap, snapping away!
Oooh, thankyou for posting such fab photos. Off to find a box and pinch some of my partner's tracing paper.
Hugs, Safari :)
hi safari lee - I'd love to see your "after" shots! good luck!!
Wow, some great examples of photography. I especially love the chalkboard idea!
I need to improve my photos as well, so I'm trying to soak up as much info as I can find. The homemade lightbox is not working for me (though it's better than not having it).
Thanks again for the tips/post.
anandi, another background idea that might work well is a simple wooden plank/board - you'd be able to stain it to achieve different wood tones or also paint it with colored gloss to achieve a nice shade of a color - like nice yummy sorbet colors :)
I'm glad you found the post useful!
Your blog is gorgeous and I appreciate your focus on etsy selling. You provide such great tips in a wonderful, aesthetic format! I look forward to reading your posts regularly. (And a big, huge thank you for featuring the "Bartletts" pear earrings from my etsy shop, too!) --Tracy / polishedtwo.etsy
hi Tracy, thanks for dropping by! Love those earrings!
Post a Comment